Patented Heart Rate Methodology
While the technology used in the Heart Zones Move Solution is best in class, that isn’t the only reason teachers around the country are choosing Heart Zones. Heart Zones, Inc has spent the last 22 years developing heart rate training methods. Through the vision of Sally Edwards and the support of a strong Heart Zones team, great methodology has been developed and is now being used in the Heart Zones Move Solution.
When comparing the Heart Zones Move Solution to other group heart rate training platforms, the science and research behind the federally patented heart rate training methodologies really does set it apart from the competition. When you run the Heart Zones Move Solution you have the unique flexibility to operate in max, threshold, or ZONING heart rate methodology. As the only system to allow this diversity, you can be confident that you are working with the best of the best when it comes to zone training and heart rate training!
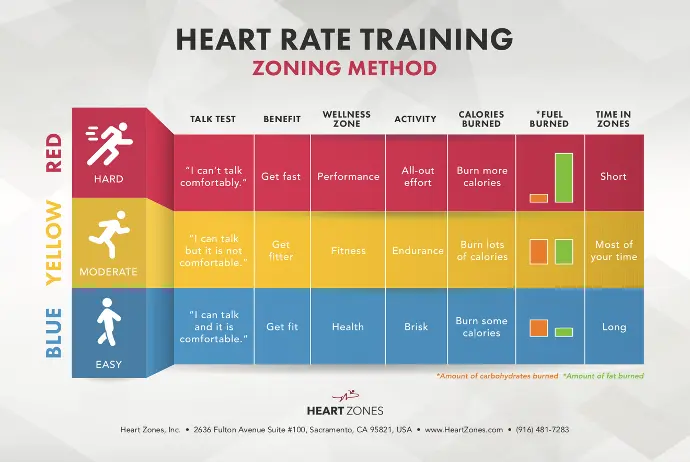
Zoning
Simply put ZONING is fitness in a blink. ZONING is a cardio fitness program using three zones, for different ranges of intensity. It’s a simple, sensible way to make the most of your workouts. ZONING energizes your body and your mind through personalized cardio-movement.

Max Heart Rate
Maximum heart rate is used to set heart rate zones, it is an anchor point, it is a bio marker. Maximum heart rate does not change with age. Your maximum heart rate is more or less static, changing over time as slowly as a glacier in the fit population.
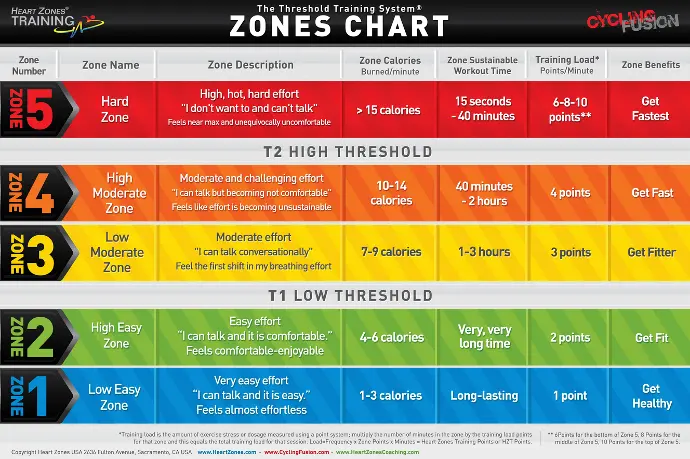
Threshold
Threshold training is a workout methodology that uses zone training with five zones and two thresholds to individualize the physical activity. These two thresholds, the T1 and T2 are a little bit more scientific in nature, but they allow for 5 zones of training versus 3.